How to Take a Screenshot on Tablet: 2026 Guide
Learn how to take a perfect screenshot on tablet. Our 2026 guide covers capture, editing, sharing, and pro tips for iPad, Samsung, and Android.
On this page
- Why Mastering Tablet Screenshots Matters
- Capturing Your Screen on Any Tablet
- The baseline method that works most often
- iPad button paths and accessibility options
- When gestures and shortcuts beat buttons
- What to Do After You Capture the Image
- Edit fast while the preview is still on screen
- Share with enough context to be useful
- From Simple Capture to High-Converting Store Assets
- Raw screenshots rarely sell the app well
- A professional workflow for tablet app assets
- Solving Issues When Screenshots Fail
- When hardware is the problem
- When the app is blocking capture on purpose
- When a work or school policy is involved
- Your Complete Tablet Screenshot Workflow
You usually need a screenshot on tablet for one of two reasons. Something happened and you need proof, or something looks good and you want to reuse it. That could be a recipe before the page refreshes, a settings screen you need to send to a parent, a bug you want engineering to reproduce, or a product screen you want to turn into an App Store asset.
That's why the basic button combo only gets you halfway. The useful part starts after capture. You crop noise, mark the important detail, save it where you can find it later, and sometimes turn that raw image into something polished enough for customers to see. The same action supports casual sharing, support workflows, QA, and store conversion.
Why Mastering Tablet Screenshots Matters#
A screenshot isn't just a saved image. It's often the fastest way to communicate what you saw without rewriting it. If a payment screen throws an error, support can understand the issue faster from one image than from three paragraphs of explanation. If a teacher posts homework instructions in a portal that times out, a screenshot preserves the exact wording.
On tablets, this matters more because the screens are larger and the contexts are broader. People use tablets for streaming, design review, shopping, remote work, school portals, and app demos. One screenshot can capture a lot of state at once. That's useful, but it also means the image can contain clutter, personal data, or irrelevant UI that needs cleanup before sharing.
Practical rule: Capture first, edit second. If the moment matters, don't stop to frame it perfectly before you save it.
Professionally, I treat screenshots as product evidence. QA uses them to document regressions. Support uses them to reduce back and forth. Growth teams use them to turn real in-app moments into store creatives. Researchers use screenshots as structured records too. A 2024 paper on phone-use regret found that capturing screenshots at 1/16 of the original resolution and at 5-second intervals was an effective tradeoff for analysis, and a separate methodology paper formalized a Five Images Method using exactly five screenshots per review cycle in video analysis, as described in this arXiv research summary on screenshot-based methods.
That shift is worth noticing. The screenshot on tablet has moved from a convenience feature to a workflow building block. For personal use, it helps you save and share. For teams, it supports debugging, reviews, and marketing. The mechanics are simple. The true value emerges when they are used deliberately.
Capturing Your Screen on Any Tablet#
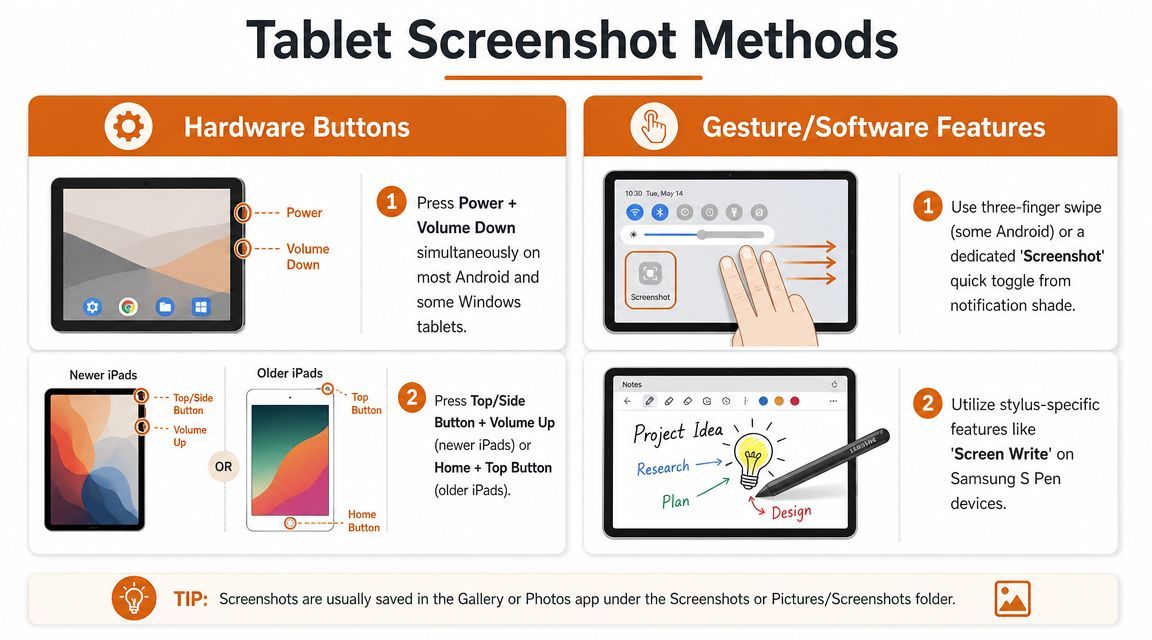
The baseline method that works most often#
On most Android tablets, the default method is still Power + Volume Down. That remains the baseline across major manufacturers. Samsung documents the Power or Side button with Volume Down, and Lenovo documents the same general pattern for Android tablets in guidance summarized on Samsung's tablet screenshot support page.
Use this method when reliability matters more than convenience. If you're filing a bug, capturing a checkout failure, or trying to save a screen before it changes, hardware buttons are still the safest first move. They don't depend on a gesture being enabled, and they work even when the screen is mounted in a kiosk stand or the app UI is busy.
A few details make this easier in practice:
- Press both buttons together: If you hit Power too early, the tablet may lock. If you hit Volume first, you may only change volume.
- Hold briefly, then release: Don't keep holding so long that the power menu appears.
- Watch for confirmation: A flash, preview thumbnail, or shutter sound usually tells you it worked.
If you use Android often, it's also worth checking a guide to a free screenshot app for Android for cases where built-in capture feels too limited.
iPad button paths and accessibility options#
iPad follows Apple's own hardware logic rather than the Android baseline. On newer models, use the Top or Side button + Volume Up. On older iPads with a Home button, use Home + Top button.
That split matters because people often try the Android combo on an iPad and assume screenshots are broken. They're not. The wrong button pairing is usually the issue.
If buttons are awkward, software controls are often better than forcing the hardware route. AssistiveTouch is especially useful for users with accessibility needs, damaged buttons, or keyboard-heavy tablet setups where reaching the side of the device is annoying. In real use, software capture is slower than hardware, but it's much more comfortable during repeated capture sessions.
When gestures and shortcuts beat buttons#
The big change in recent years is that screenshotting isn't limited to buttons anymore. Many Android tablets support a three-finger swipe gesture, and some devices let you add a Screenshot control to Quick Settings. Samsung also supports alternatives such as palm swipe, Bixby or Google Assistant voice commands, S Pen Screen write, and a Tasks Edge panel shortcut, based on the same Samsung support guidance cited above.
Here's when each route tends to work best:
| Method | Best use case | Trade-off |
|---|---|---|
| Hardware buttons | Fast capture under pressure | Can be awkward with cases or mounts |
| Quick Settings tile | Repeated capture in testing sessions | Slightly slower to open panel |
| Three-finger swipe | One-handed or natural gesture users | Not available on every device |
| S Pen Screen write | Annotating immediately after capture | Samsung-specific workflow |
| Voice assistant | Hands busy or accessibility scenario | Slower and less discreet |
If you take lots of screenshots on a tablet with a thick case or keyboard cover, the Quick Settings tile often becomes the method you actually use every day, even if hardware buttons remain the technical default.
On Amazon Fire tablets, the documented method is to press and hold Volume Down + Power for one second. Amazon also notes the usual confirmation signals: a brief screen flash, a smaller centered preview image, and a shutter sound if volume is enabled, in its Fire tablet screenshot documentation. That kind of visual feedback matters because timing drift is one of the main reasons people think the feature failed when it didn't.
What to Do After You Capture the Image#
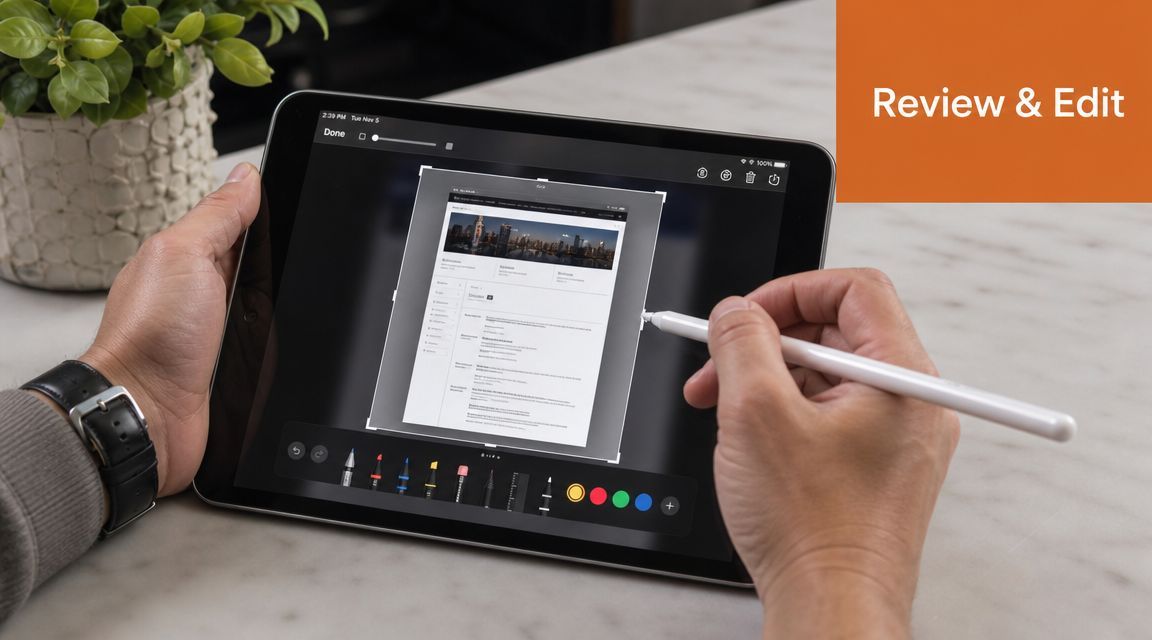
Edit fast while the preview is still on screen#
The small preview that appears after a screenshot is your best opportunity to make the image useful. Tap it immediately. On most tablets, that opens the built-in editor before the file gets buried in your gallery.
Start with crop. A raw screenshot on tablet often includes status icons, notifications, odd spacing, or navigation chrome that doesn't help the recipient. If you're sending a bug to engineering, crop tightly around the broken component and leave enough surrounding UI for context. If you're saving a recipe or article section, trim everything except the content you'll need later.
Then mark it up. The most useful annotation tools are basic:
- Circle the issue: Good for error messages, wrong prices, and missing buttons.
- Use arrows sparingly: One arrow usually beats three circles.
- Add a short note: “This button does nothing” is better than assuming the viewer understands the problem.
- Blur or cover sensitive data: Names, email addresses, order details, and account balances shouldn't travel unless necessary.
If you've lost track of where the file goes after capture, it helps to know where to find screenshots on Android, especially on devices that split gallery folders by app or manufacturer skin.
A good support screenshot answers two questions at once. What went wrong, and where on the screen should I look?
Share with enough context to be useful#
Most failed screenshot sharing isn't a capture problem. It's a context problem. Someone receives an image and still doesn't know what app, what step, or what went wrong.
A simple format works well for support and team communication:
- Say what you were doing
Example: “Trying to export a PDF from the invoice screen.” - Attach the annotated screenshot
Mark the exact element, not the whole screen. - Add one line about expected behavior
Example: “I expected the Share sheet to open.”
That's enough for family tech help too. If someone asks where a setting lives, a marked-up screenshot saves time because they can match the screen visually instead of decoding written directions.
For a quick visual walkthrough of markup and sharing behavior, this short demo is useful:
When you save edited screenshots, use cloud storage or a dedicated project folder if the image has ongoing value. Casual captures can stay in Photos. Anything tied to a release, bug, customer complaint, or marketing review should live somewhere searchable.
From Simple Capture to High-Converting Store Assets#
Raw screenshots almost never belong in an App Store or Google Play listing. They're evidence, not marketing. A store asset has to explain value quickly, and a raw screen usually contains too much interface and not enough message.
That's even more obvious on tablets. Bigger layouts reveal more detail, which sounds helpful but often dilutes the main point. Users don't need to inspect every menu item. They need to understand what outcome the app delivers and why this screen proves it.
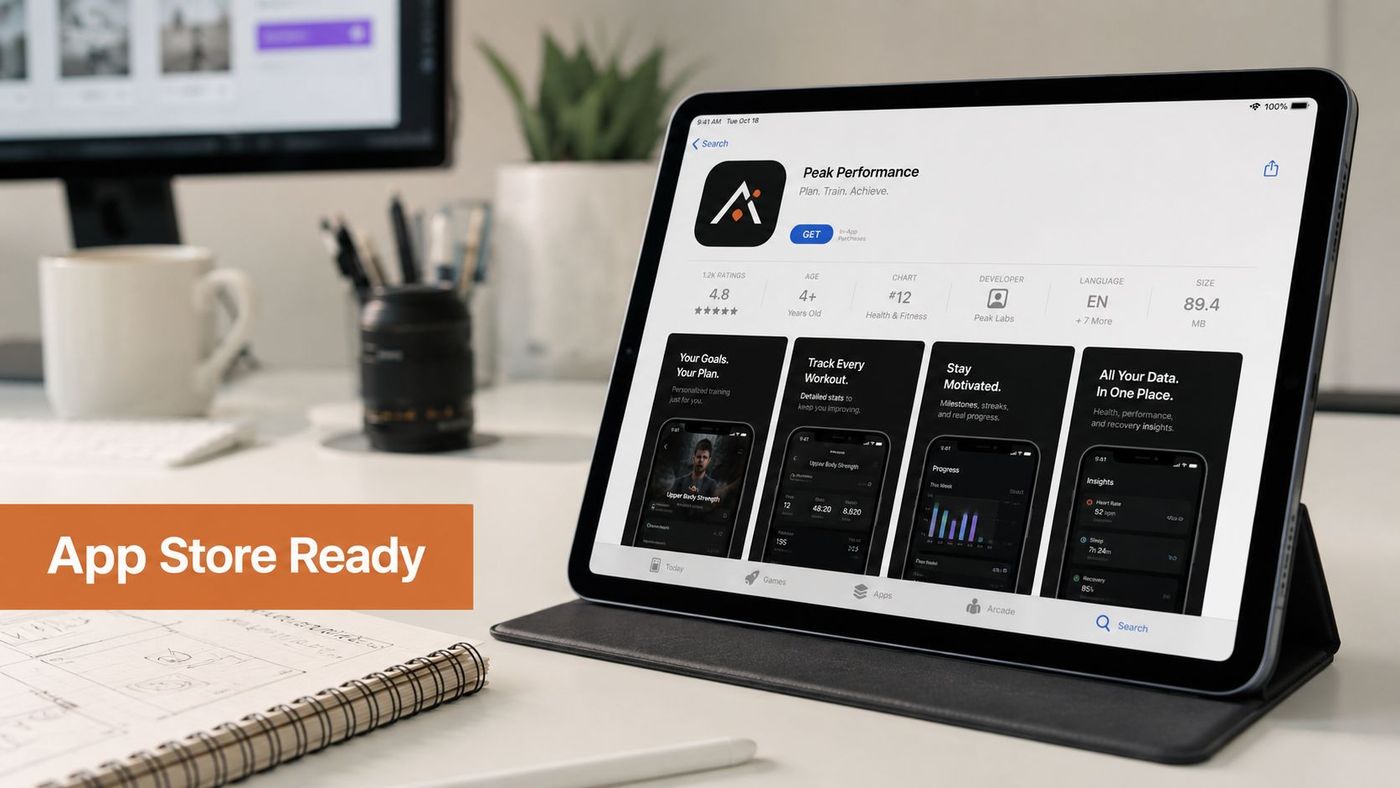
Raw screenshots rarely sell the app well#
The strongest store sets usually do three things:
- Lead with the payoff: Don't label a screen “Dashboard.” Say what the user gets from it.
- Show one idea per frame: If a screenshot sells budgeting, don't also try to sell reporting, alerts, and collaboration in the same image.
- Keep the UI authentic: Real product evidence builds trust. Overdesigned mockups that hide the actual interface usually backfire.
I've seen teams waste time polishing captions before they fix screenshot selection. That's backwards. Pick the most marketable moments first. Then decide the story order. Then refine layout and text.
A professional workflow for tablet app assets#
Android's screenshot testing guidance is useful here because it correctly frames the bottleneck. The hard part isn't pressing the buttons. It's repeatability. Android's docs describe comparing screenshots against approved golden images and recommend either tolerance thresholds for small rendering changes or structural comparison instead of raw pixel equality in its official screenshot testing documentation. On tablets, that matters more because larger screens expose more layout variability.
For product and growth teams, that leads to a practical split:
| Workflow stage | What to optimize for |
|---|---|
| Raw capture | Correct state, clean UI, fixed device conditions |
| QA validation | Consistency against approved references |
| Marketing composition | Narrative, headlines, framing, localization |
That separation saves rework. Don't ask designers to polish screenshots that came from inconsistent device states. Lock orientation, brightness, theme, locale, status bar state, and notifications before capture. Then compose the marketing layer afterward.
If you want tooling for the composition side, AppGrowKit's App Store screenshot generator is one option for turning real app screens into store-ready layouts with copy and localization workflows. It's useful when the product team already has authentic UI captures and needs structured output rather than blank-canvas design.
Solving Issues When Screenshots Fail#
A failed screenshot usually points to one of three causes: the button method is unreliable, the app is blocking capture, or the tablet is managed by an organization that restricts screenshots. Identify which one applies first. That saves time and avoids random setting changes that do nothing.
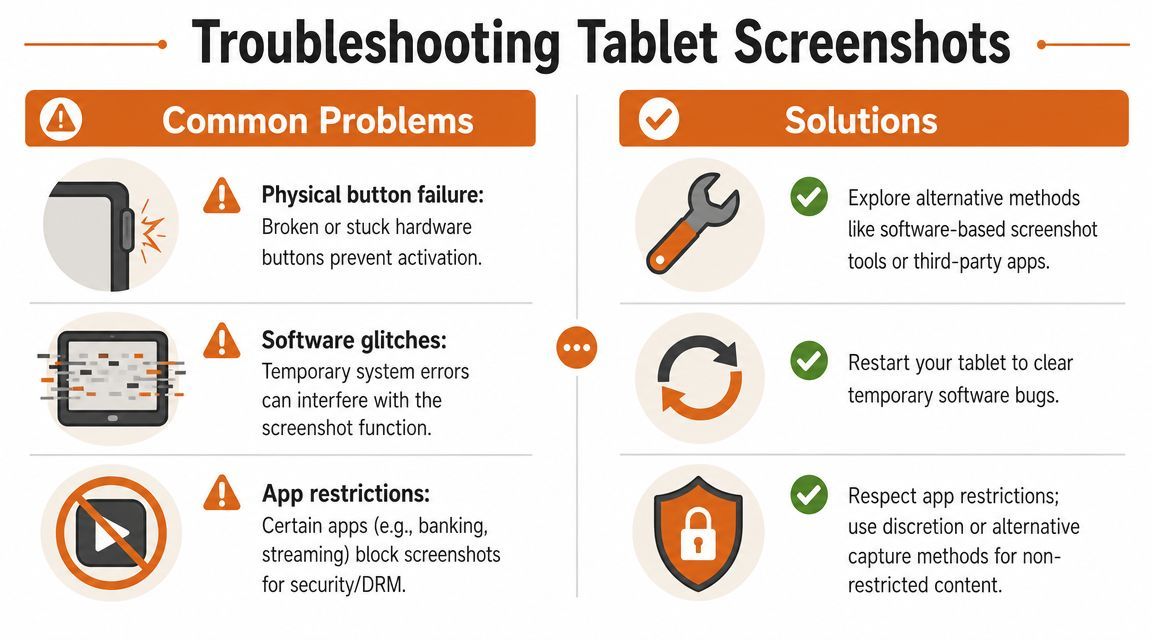
When hardware is the problem#
Button failures are common on tablets with thick cases, worn power keys, or awkward button placement. I usually test the simplest question first: does the screenshot fail because the tablet cannot capture, or because the physical input is inconsistent?
If the issue is mechanical, retries rarely help. A software path is faster and more reliable. Many Android tablets offer a Screenshot tile in Quick Settings, and some support a three-finger gesture or stylus shortcut. This Android tablet screenshot fallback walkthrough shows the common alternatives.
Run these checks in this order:
- Open Quick Settings: Look for a Screenshot tile, or edit the panel and add it.
- Try a gesture: Some brands enable three-finger swipe by default, others hide it in settings.
- Restart once: Temporary input bugs can interfere with button combinations.
- Remove the case: A case can reduce button travel just enough to break the shortcut.
For support teams and app testers, this distinction matters. If hardware input is flaky, your capture workflow is already unstable. Fix that before you try to document bugs or create store assets, because inconsistent capture leads to wasted review cycles later.
When the app is blocking capture on purpose#
If screenshots fail in one app but work everywhere else, treat that as a policy decision, not a device defect. Banking apps, streaming services, secure messaging flows, and private browsing screens often disable capture to protect account data or licensed content.
The practical test is simple. Try taking a screenshot on the home screen, then in Settings, then in the problem app. If only the app fails, the app is the answer.
Respect the restriction. In regulated or DRM-protected apps, the right next step is to use the app's export, share, or support flow instead of trying to bypass the block.
This comes up often in troubleshooting. A user reports “screenshots are broken,” but the underlying issue is that they need a record for support or compliance. The fix is a different documentation path, not a different button combo.
When a work or school policy is involved#
Managed tablets follow a different rulebook. Work profiles, school device controls, and administrator apps can disable screenshots in specific apps or across the managed environment. As noted earlier, these restrictions can come from app settings or device administration policies, so checking profile controls and admin apps is part of the diagnosis.
Use this quick triage:
| Symptom | Likely cause | Best next step |
|---|---|---|
| Fails everywhere | Hardware or system issue | Test a software fallback, then restart |
| Fails in one app only | App restriction | Check the app's help center or policy |
| Fails in work apps only | Admin policy | Review work profile settings or contact IT |
That pattern matters for more than convenience. Casual users want the screenshot to save. Product teams need to know whether the failure is reproducible, policy-driven, or worth escalating as a bug. Clear diagnosis keeps support tickets cleaner and keeps QA from filing issues that engineering cannot and should not “fix.”
Your Complete Tablet Screenshot Workflow#
A tablet screenshot often starts as a quick save for later. Ten minutes later, it is part of a support ticket, a bug report, a design review, or an app store asset request. That shift is why the workflow matters.
Start by choosing the capture method that fits the moment. Hardware buttons are the reliable default. Gestures, Quick Settings shortcuts, stylus tools, and accessibility options are better when you need speed, repeatability, or a workaround for worn buttons. On product teams, I treat the capture step as a quality decision, not just a button press. The cleaner the original image, the less time you waste fixing it later.
What happens after capture determines whether the screenshot is useful. For support, crop tightly, remove anything irrelevant, and annotate only the detail that explains the issue. For personal reference, rename or file the image immediately so it does not disappear into a generic gallery folder. For app marketing, keep a raw version untouched, then build a separate composed version for captions, device framing, and localization.
Diagnosis belongs in the workflow too. If screenshots stop working, check the pattern before you start guessing. A failure in one app usually points to content protection or app policy. A failure in work-managed apps often points to administrator controls. Broader failures are more likely tied to device settings, input methods, or system issues, as noted earlier.
The simple habit is this. Capture cleanly, edit with a purpose, store the original, and verify whether the image is meant for memory, support, QA, or conversion. Teams that do that well get faster bug reports, cleaner documentation, and better-performing store creatives.
If you're turning real app screens into store-ready visuals, AppGrowKit helps mobile teams convert authentic UI into App Store and Google Play screenshot sets with structured layouts, copy, and localization support.
Stop reading. Start ranking.
AppGrowKit takes everything in this article and runs it for you: keyword research, live ranks, conversion-focused screenshots, and market intel. Free to start.